This is another article about OpenStack with Ceph as the storage backend. Like my other posts about this topic this is not about how to install and configure your private cloud but it’s more a collection of obstacles you could be facing. For me it’s also an online documentation in case I forgot what I did weeks, months or even years ago.
Now let’s get to it. We’ve been working with Ceph for quite a while now, it’s really comfortable launching instances within seconds. But from time to time we noticed that some instances took several minutes to boot, and there was nothing obvious happening on the compute nodes or in the Ceph cluster. So we didn’t really bother to debug it further, it’s not too bad if you have to wait one minute or so for a 6 GB instance to start.
But last week I decided to take a closer look into that, I found it annoying that I didn’t know what was going on. The first step is to enable debug logs, of course, so I did that. And there I found the first hint in nova-compute.log:
[...] rbd import --pool images /var/lib/nova/instances/_base/3c60237fbf59101d3411c4f795d0a72b82752e0b c6ab3943-3292-44d4-916e-e3a29460a891_disk --image-format=2 --id openstack --conf /etc/ceph/ceph.conf [...]
What is that ‘_base’ file?
compute4:~ # ls -l /var/lib/nova/instances/_base/3c60237fbf59101d3411c4f795d0a72b82752e0b
-rw-r--r-- 1 nova nova  6442450944  5. Okt 09:51 3c60237fbf59101d3411c4f795d0a72b82752e0b

compute4:~ # fdisk -l /var/lib/nova/instances/_base/3c60237fbf59101d3411c4f795d0a72b82752e0b
Disk /var/lib/nova/instances/_base/3c60237fbf59101d3411c4f795d0a72b82752e0b: 6 GiB, 6442450944 bytes, 12582912 sectors
Units: sectors of 1 * 512 = 512 bytes
Sector size (logical/physical): 512 Bytes / 512 Bytes
I/O size (minimum/optimal): 512 Bytes / 512 Bytes
Disklabel type: dos
Disk identifier: 0x6768c283

Device                                                                  Boot Start      End  Sectors Size Id Type
/var/lib/nova/instances/_base/3c60237fbf59101d3411c4f795d0a72b82752e0b1 *     2048 12582911 12580864   6G 8e Linux LVM
Okay, I have two questions:
- Why is there a full image as a single file in the compute node’s filesystem?
- Why does nova import that full image back into Ceph instead of cloning it?
One problem is that an imported image has no parent data, it is a flat (independent) RBD image so it takes up all the space instead of being a Copy-on-Write clone (CoW). This is not what we signed up for when using Ceph! And it’s also not what we are seeing most of the time, usually all of this works fine for us, so what is different with this image?
To make it short: it’s the disk-format we inject into the image when we upload it to glance, so something like this:
control:~ # openstack image create --file /var/lib/glance/images/suse-image.raw --disk-format raw --public suse-image
Although it’s been always clear that it’s recommended to use raw images with Ceph it’s still possible to use other formats, such as qcow2 or iso. So when we uploaded ISO images into the cloud we set the flag --disk-format iso to be able to distinguish the image types, assuming this was just a display option and not something the nova code would actually process. Well, we were wrong.
With the rbd backend Nova expects the image to be in raw format, and if it’s not, the image will be downloaded to the compute node, converted into raw format and uploaded back to Ceph as a flat image. You’ll find log entries like these:
[...] rbd image clone requires image format to be 'raw' but image rbd://<Cluster_ID>/images/<IMAGE_ID>/snap is 'iso' is_cloneable [...]
Ok, understood, I should only use raw images if I want to benefit from CoW clones.
But it’s still not clear to me how that ‘_base’ file is created, because if I create a new image based on a fresh installation (from ISO) I upload a Cinder volume to Glance, and that doesn’t have a flag like that. The workflow to create a new base image from an ISO is usually like this:
-
- Launch instance from ISO
If the disk-format is “iso” this will result in a new file in /var/lib/nova/instances/_base/.
-
- Attach empty volume to instance
- Perform installation
- Delete instance
- Upload volume to Glance
The uploaded image doesn’t have the “disk-format” flag.
Since I create the new image from volume Nova will eventually delete the ‘_base’ file of the ISO while new instances are created as CoW clones directly on RBD level. But for some reason – I could not reproduce this yet – sometimes when a new instance is launched the base image from Glance is downloaded to the compute node, serving as image cache for Nova leading to the above described behavior.
And the funny part is that if you (re)move that ‘_base’ file and launch another fresh instance from that image you’ll end up with a clean rbd clone as expected, something like this should be visible in the logs:
[...] cloning images/<IMAGE_ID>@snap to None/<NOVA_UUID>_disk clone [...]
So there’s still one question left: why did Nova download the base image to the compute node if it already was a raw image residing in Ceph?
I have no answer yet, but I’ll update this post as soon as I have figured it out.
The important lesson from this is: be aware of Nova requiring disk space if you intend to use non-raw formats with your Ceph backend, otherwise consider converting your qcow images to raw format and re-uploading them to Glance.
Workaround
If you’re wondering if it’s possible to simply change the disk-format for existing Glance images, the answer is (as usual) “it depends”.
What you can’t do is changing the disk-format in Horizon dashboard or with the openstack CLI, this will result in an error:
control:~ # openstack image set --disk-format raw <IMAGE_ID>
403 Forbidden
Attribute disk_format can be only replaced for a queued image.
    (HTTP 403)
So this will only work while the image is queued and the upload has not started yet.
The alternative is the manipulation of the database, which is usually not recommended! But if you know what you’re doing you can change that flag like this:
MariaDB [glance]> update glance.images set disk_format='raw' where id='<IMAGE_ID>';
Query OK, 1 row affected (0.12 sec)
Rows matched: 1  Changed: 1  Warnings: 0
If that manipulated image was a real ISO this will (probably) work and a newly spawned instance will be created as a rbd clone. Such a change can work for some other formats, too, but there’s no way to predict anything. Most certainly this won’t work for qcow2 images, you’ll either have to keep them and monitor the disk space on your compute nodes or you convert the respective images into raw format an re-upload them. I didn’t have other image formats at hand to test further, we basically only use qcow2, ISOs and raw images in our environment, so if you have further information for other formats feel free to comment.
Raw or qcow?
Now let’s put that “strange” behavior aside and focus on a different question. Which format is better for Glance, raw or qcow2?
I’ll focus only on “raw” and “qcow2” since those are relevant for our environment and their difference may be significant regarding the effectiveness of thin-provisioning.
Of course, there are different scenarios where one format succeeds over the other: on the one hand, a qcow image usually needs much less space in storage than a raw image. On the other hand, in an OpenStack environment this can neutralize the benefits of qcow if the base image has to be downloaded to the local filesystem. This results in longer boot processes for new instances, which then are flat and need more storage space than a CoW clone (assuming you mostly use ephemeral disks), and the base image also needs space on the compute node.
A raw image needs more space in the Glance filestore, yes, but launching new instances only takes a few seconds and the Nova disk is a clone, so it requires no additional space at creation time (copy-on-write). Again, this only applies to ephemeral disks. If you usually have instances based on volumes this doesn’t apply to you. Volume based instances also take more time to boot because the image’s content is copied to the volume so it’s also a flat rbd image.
So let’s take a closer look on the difference between qcow2 and raw.
I created a raw image full of zeroes, total size 4 GB:
leap15:~# dd if=/dev/zero of=image.raw bs=4M count=1000

leap15:~# ls -lh image.raw
-rw-r--r-- 1 root root 4,0G  8. Okt 13:58 image.raw
Then I convert it into a qcow2 image:
leap15:~# qemu-img convert -f raw -O qcow2 image.raw image.qcow2

leap15:~# ls -lh image.qcow2
-rw-r--r-- 1 root root 193K  8. Okt 14:00 image.qcow2
Notice the difference between the image size.
Upload them both to Ceph:
leap15:~# rbd import image.raw test1/image.raw

leap15:~# rbd import image.qcow2 test1/image.qcow2
Looking deeper into the rbd images:
leap15:~# rbd info test1/image.raw
rbd image 'image.raw':
        size 4000 MB in 1000 objects
        order 22 (4096 kB objects)
        block_name_prefix: rbd_data.f4c3116b8b4567
        format: 2
        features: layering, exclusive-lock, object-map
        flags:
        create_timestamp: Mon Oct  8 14:01:50 2018

leap15:~# rbd info test1/image.qcow2
rbd image 'image.qcow2':
        size 192 kB in 1 objects
        order 22 (4096 kB objects)
        block_name_prefix: rbd_data.e5389d6b8b4567
        format: 2
        features: layering, exclusive-lock, object-map
        flags:
        create_timestamp: Mon Oct  8 14:01:44 2018
Alright, the sizes are what we expected. But what about the real size of the rbd images?
leap15:~# rbd diff test1/image.raw | awk '{ SUM += $2 } END { print SUM/1024/1024 " MB" }'
0 MB

leap15:~# rbd diff test1/image.qcow2 | awk '{ SUM += $2 } END { print SUM/1024/1024 " MB" }'
0.128906 MB
You didn’t expect that, did you!
The command rbd diff $pool/$image provides the “difference since the beginning of time, so it reports all extents”, read this for more information.
We see that Ceph’s own thin-provisioning of raw images works quite nice! You could even say that the advantages of qcow disappear (in this context) because there’s some additional metadata to be stored about which data blocks exist and which can be skipped.
In conclusion this means that – again: it depends on your requirements – if possible choose raw over qcow2 images when working with OpenStack and Ceph.
Update 1 (October, 10th 2018):
Although it’s still not possible to reproduce this in a reliable way I encountered the same incident.
I had created a volume based instance to upload the volume as a new Glance image. I did this via Horizon dashboard where you have a dropdown to choose the image’s disk-format:
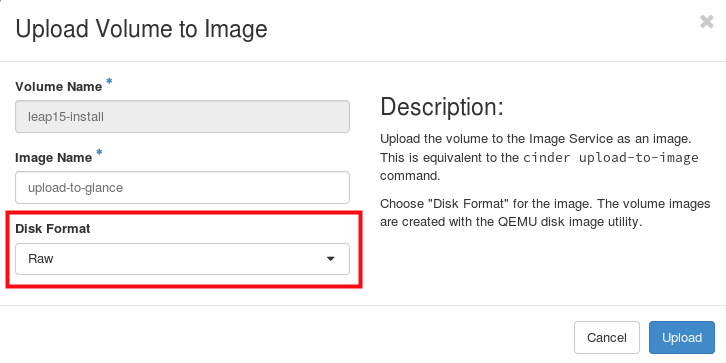
Volume upload to Glance
For some reason this was set to “qcow2” instead of the default “raw”, leading to the above described symptoms.
To avoid any Horizon based interference you could simply upload the volume via CLI:
control:~ # openstack image create --volume ef85d345-de30-481e-a231-0964535266ec --disk-format raw upload-to-glance
+---------------------+--------------------------------------+
| Field               | Value                                |
+---------------------+--------------------------------------+
| container_format    | bare                                 |
| disk_format         | raw                                  |
| display_description |                                      |
| id                  | ef85d345-de30-481e-a231-0964535266ec |
| image_id            | 36192f2e-d648-4da7-a17b-bbffbf8cc451 |
| image_name          | upload-to-glance                     |
| protected           | False                                |
| size                | 1                                    |
| status              | uploading                            |
| updated_at          | 2018-10-10T09:42:00.000000           |
| visibility          | shared                               |
| volume_type         | None                                 |
+---------------------+--------------------------------------+
That should prevent unintentional or wrong image uploads and keep the advantages of CoW clones.
Update 2 (March, 7th 2019):
I finally found an answer to my question. I already knew that some kind of image caching seemed to be active, I just didn’t know where to look exactly, I had already searched for all kinds of things, including looking into the python code. But with some luck I found this answer. So the answer is pretty simple, disable image caching in nova by setting cache_images = none in nova.conf on all compute nodes and restart the nova-compute.service.
Disclaimer, and please leave a comment below
And as always with such articles: The steps above do work for us, but needn’t work for you. So if anything goes wrong while you try to reproduce above procedure, it’s not our fault, but yours. And it’s yours to fix it! But whether it works for you or not, please leave a comment below so that others will know.