This article describes what you could be facing when trying to attach devices (such as ISO images from SLES12-DVD) to cloud instances. Even though the Horizon UI reports success that your ISO has been attached to your instance it’s possible that you can’t access the contents.The environment I refer to is based on SUSE Cloud 5 with 1 admin node (VM, SLES11), 1 control node (physical, SLES11), 2 compute nodes (both physical, 1 with SLES11, the other with SLES12). The hypervisor on both compute nodes is Xen.
Background
Before I describe how to access the device’s contents I’d like to point something out. I get the impression that SUSE Cloud doesn’t support all formats as volume attachments for instances. I wanted to create a volume from a SLES12-DVD.iso and attach it to an instance. The volume was created successfully but attaching it to a VM failed. My colleague pointed me into the direction that it could be due to format issues, the SLES12-DVD is an EFI-extended ISO:
root@somehost:~ # fdisk -l TS-SLE-12-Server-DVD-x86_64-GM-DVD.iso

Disk TS-SLE-12-Server-DVD-x86_64-GM-DVD.iso: 2937 MB, 2937061376 bytes, 5736448 sectors
Units = Sektoren of 1 * 512 = 512 bytes
Sector size (logical/physical): 512 bytes / 512 bytes
I/O size (minimum/optimal): 512 bytes / 512 bytes
Disk label type: dos
Disk identifier: 0x24f4bd80

                                 Gerät  boot.     Anfang        Ende     Blöcke   Id  System
TS-SLE-12-Server-DVD-x86_64-GM-DVD.iso1            2420       10611        4096   ef  EFI (FAT-12/16/32)
TS-SLE-12-Server-DVD-x86_64-GM-DVD.iso2   *       10612     5736447     2862918   17  Hidden HPFS/NTFS
So I tried a different image:
root@somehost:~ # fdisk -l ubcd50RC1.iso

Disk ubcd50RC1.iso: 283 MB, 283828224 bytes, 554352 sectors
Units = Sektoren of 1 * 512 = 512 bytes
Sector size (logical/physical): 512 bytes / 512 bytes
I/O size (minimum/optimal): 512 bytes / 512 bytes

root@somehost:~ # file ubcd50RC1.iso
ubcd50RC1.iso: # ISO 9660 CD-ROM filesystem data 'UBCD50RC1' (bootable)
This ISO was attached without any problem, I could access it immediately on my instance. I tried two or three more ISOs to verify it and everytime I got the same result. If I haven’t misconfigured my cloud and maybe some of you can confirm my observation, I hope there will be an update soon regarding the relevancy of EFI-extended ISOs.
Possible Problem(s)
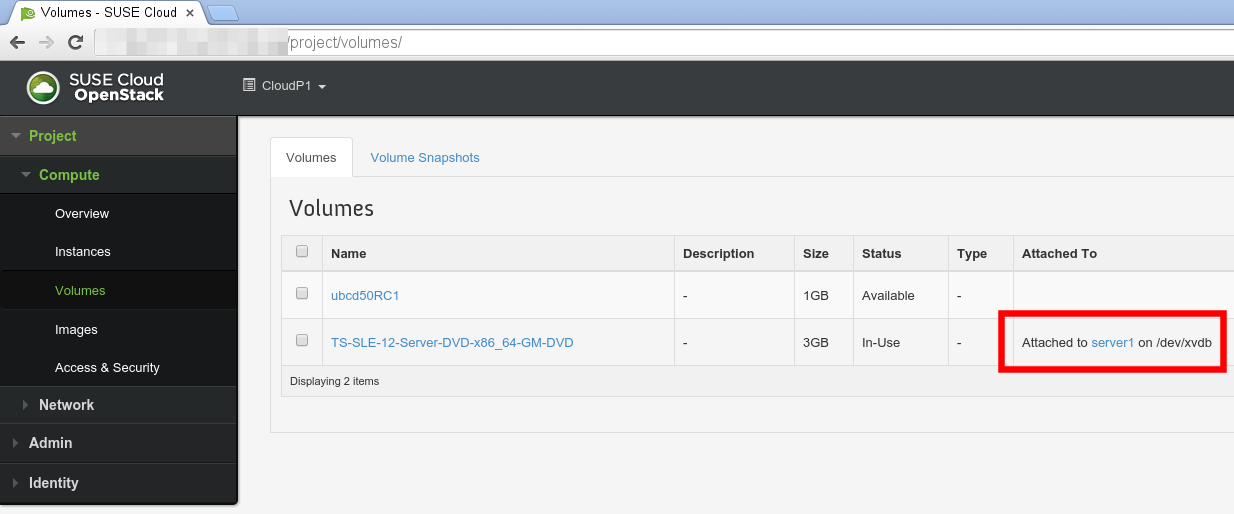
Now back to the topic: if you use the GUI to create a volume based on an ISO image and you want to attach it to an instance you’ll probably think it worked, the screenshot shows what you’ll see in the UI:
If you observe the nova-compute logs, you’ll notice:
2015-09-30 14:32:07.558 2312 INFO nova.compute.resource_tracker [-] Compute_service record updated for d0c-c4-7a-06-71-f0:d0c-c4-7a-06-71-f0.domain
2015-09-30 14:33:02.175 2312 AUDIT nova.compute.manager [req-5ad50b9c-189e-4621-a98d-8c9e7073cbad None] [instance: fb6227fb-bcb7-4105-9aac-30c222333e3e] Attaching volume 21daa760-6b9e-41ea-bae8-adf2130b15d5 to /dev/xvdb
2015-09-30 14:33:07.027 2312 AUDIT nova.compute.resource_tracker [-] Auditing locally available compute resources
Alright, let’s check if we can access it from the VM, login onto server1 and you’ll see this:
server1:~ # cat /proc/partitions
 major minor  #blocks  name

 202        0    5242880 xvda
 202        1     730112 xvda1
 202        2    4511744 xvda2
There is no device xvdb!
Take a look in the cinder-volume.log:
2015-09-30 14:32:36.603 7468 INFO cinder.volume.manager [-] Updating volume status
2015-09-30 14:32:36.929 7468 INFO cinder.volume.manager [-] Updating volume replication status.
2015-09-30 14:33:03.967 7468 INFO cinder.brick.iscsi.iscsi [req-dd153589-9ead-4bf1-89b1-926fd27ba5ec 85f54aca144449bcb44420d8f710f303 29846cf59415446aba902379c74afeea - - -] Creating iscsi_target for: volume-21daa760-6b9e-41ea-bae8-adf2130b15d5
2015-09-30 14:33:36.603 7468 INFO cinder.volume.manager [-] Updating volume status
2015-09-30 14:33:36.974 7468 INFO cinder.volume.manager [-] Updating volume replication status.
No errors or anything suspicious. In the /var/log/messages of my compute node I only see this:
2015-09-30T14:33:19.365626+02:00 d0c-c4-7a-06-71-f0 sudo:     nova : TTY=unknown ; PWD=/ ; USER=root ; COMMAND=/usr/bin/nova-rootwrap /etc/nova/rootwrap.conf iscsiadm -m session
2015-09-30T14:33:19.366687+02:00 d0c-c4-7a-06-71-f0 sudo: pam_unix(sudo:session): session opened for user root by (uid=0)
2015-09-30T14:33:19.455314+02:00 d0c-c4-7a-06-71-f0 sudo: pam_unix(sudo:session): session closed for user root
2015-09-30T14:33:19.496726+02:00 d0c-c4-7a-06-71-f0 sudo:     nova : TTY=unknown ; PWD=/ ; USER=root ; COMMAND=/usr/bin/nova-rootwrap /etc/nova/rootwrap.conf iscsiadm -m node -T iqn.2010-10.org.openstack:volume-21daa760-6b9e-41ea-bae8-adf2130b15d5 -p 192.168.124.81:3260
2015-09-30T14:33:19.497731+02:00 d0c-c4-7a-06-71-f0 sudo: pam_unix(sudo:session): session opened for user root by (uid=0)
2015-09-30T14:33:19.600927+02:00 d0c-c4-7a-06-71-f0 sudo: pam_unix(sudo:session): session closed for user root
2015-09-30T14:33:19.647684+02:00 d0c-c4-7a-06-71-f0 sudo:     nova : TTY=unknown ; PWD=/ ; USER=root ; COMMAND=/usr/bin/nova-rootwrap /etc/nova/rootwrap.conf iscsiadm -m node -T iqn.2010-10.org.openstack:volume-21daa760-6b9e-41ea-bae8-adf2130b15d5 -p 192.168.124.81:3260 --op update -n node.session.auth.authmethod -v CHAP
2015-09-30T14:33:19.649531+02:00 d0c-c4-7a-06-71-f0 sudo: pam_unix(sudo:session): session opened for user root by (uid=0)
2015-09-30T14:33:19.742833+02:00 d0c-c4-7a-06-71-f0 sudo: pam_unix(sudo:session): session closed for user root
2015-09-30T14:33:19.783968+02:00 d0c-c4-7a-06-71-f0 sudo:     nova : TTY=unknown ; PWD=/ ; USER=root ; COMMAND=/usr/bin/nova-rootwrap /etc/nova/rootwrap.conf iscsiadm -m node -T iqn.2010-10.org.openstack:volume-21daa760-6b9e-41ea-bae8-adf2130b15d5 -p 192.168.124.81:3260 --op update -n node.session.auth.username -v 6GPzf5CfEi2M6xU4juPx
2015-09-30T14:33:19.784914+02:00 d0c-c4-7a-06-71-f0 sudo: pam_unix(sudo:session): session opened for user root by (uid=0)
2015-09-30T14:33:19.887892+02:00 d0c-c4-7a-06-71-f0 sudo: pam_unix(sudo:session): session closed for user root
2015-09-30T14:33:19.928488+02:00 d0c-c4-7a-06-71-f0 sudo:     nova : TTY=unknown ; PWD=/ ; USER=root ; COMMAND=/usr/bin/nova-rootwrap /etc/nova/rootwrap.conf iscsiadm -m node -T iqn.2010-10.org.openstack:volume-21daa760-6b9e-41ea-bae8-adf2130b15d5 -p 192.168.124.81:3260 --op update -n node.session.auth.password -v 2ZvdwNrN8sod3ctd
2015-09-30T14:33:19.929467+02:00 d0c-c4-7a-06-71-f0 sudo: pam_unix(sudo:session): session opened for user root by (uid=0)
2015-09-30T14:33:20.032948+02:00 d0c-c4-7a-06-71-f0 sudo: pam_unix(sudo:session): session closed for user root
2015-09-30T14:33:20.075362+02:00 d0c-c4-7a-06-71-f0 sudo:     nova : TTY=unknown ; PWD=/ ; USER=root ; COMMAND=/usr/bin/nova-rootwrap /etc/nova/rootwrap.conf iscsiadm -m session
2015-09-30T14:33:20.076316+02:00 d0c-c4-7a-06-71-f0 sudo: pam_unix(sudo:session): session opened for user root by (uid=0)
2015-09-30T14:33:20.173879+02:00 d0c-c4-7a-06-71-f0 sudo: pam_unix(sudo:session): session closed for user root
2015-09-30T14:33:20.211349+02:00 d0c-c4-7a-06-71-f0 sudo:     nova : TTY=unknown ; PWD=/ ; USER=root ; COMMAND=/usr/bin/nova-rootwrap /etc/nova/rootwrap.conf iscsiadm -m node --rescan
2015-09-30T14:33:20.212346+02:00 d0c-c4-7a-06-71-f0 sudo: pam_unix(sudo:session): session opened for user root by (uid=0)
2015-09-30T14:33:20.314828+02:00 d0c-c4-7a-06-71-f0 sudo: pam_unix(sudo:session): session closed for user root
2015-09-30T14:33:20.354248+02:00 d0c-c4-7a-06-71-f0 sudo:     nova : TTY=unknown ; PWD=/ ; USER=root ; COMMAND=/usr/bin/nova-rootwrap /etc/nova/rootwrap.conf iscsiadm -m session --rescan
2015-09-30T14:33:20.356103+02:00 d0c-c4-7a-06-71-f0 sudo: pam_unix(sudo:session): session opened for user root by (uid=0)
2015-09-30T14:33:20.451910+02:00 d0c-c4-7a-06-71-f0 sudo: pam_unix(sudo:session): session closed for user root
2015-09-30T14:33:20.505560+02:00 d0c-c4-7a-06-71-f0 kernel: [17955.197615] vbd vbd-3-51728: 2 creating vbd structure
2015-09-30T14:33:20.509553+02:00 d0c-c4-7a-06-71-f0 kernel: [17955.200796] blkback: event-channel 11
2015-09-30T14:33:20.509568+02:00 d0c-c4-7a-06-71-f0 kernel: [17955.200881] blkback: protocol 1 (x86_64-abi)
2015-09-30T14:33:20.509571+02:00 d0c-c4-7a-06-71-f0 kernel: [17955.201278] blkback: ring-ref 797
2015-09-30T14:33:20.547814+02:00 d0c-c4-7a-06-71-f0 logger: /etc/xen/scripts/block: add XENBUS_PATH=backend/vbd/3/51728
2015-09-30T14:34:01.250894+02:00 d0c-c4-7a-06-71-f0 cron[20544]: pam_unix(crond:session): session opened for user root by (uid=0)
2015-09-30T14:34:01.253597+02:00 d0c-c4-7a-06-71-f0 kernel: [17995.944716] type=1006 audit(1443616441.246:175): pid=20544 uid=0 old auid=4294967295 new auid=0 old ses=4294967295 new ses=174 res=1
2015-09-30T14:34:01.260669+02:00 d0c-c4-7a-06-71-f0 CRON[20545]: (root) CMD (python < /usr/share/rhn/virtualization/poller.py)
2015-09-30T14:34:02.189667+02:00 d0c-c4-7a-06-71-f0 CRON[20544]: pam_unix(crond:session): session closed for user root
2015-09-30T14:34:08.064034+02:00 d0c-c4-7a-06-71-f0 sudo:     nova : TTY=unknown ; PWD=/ ; USER=root ; COMMAND=/usr/bin/nova-rootwrap /etc/nova/rootwrap.conf blockdev --getsize64 /dev/disk/by-path/ip-192.168.124.81:3260-iscsi-iqn.2010-10.org.openstack:volume-21daa760-6b9e-41ea-bae8-adf2130b15d5-lun-1
Still no hint that anything went wrong. But the device has to be somewhere, right? Well, it is:
root@compute:~ # xl list
Name                                        ID   Mem VCPUs      State   Time(s)
Domain-0                                     0 55393     8     r-----     977.7
instance-00000120                            3  1024     1     -b----      32.0

root@compute:~ # xl block-list 3
Vdev  BE  handle state evt-ch ring-ref BE-path
51712 0   3      4     9      8        /local/domain/0/backend/vbd/3/51712
51728 0   3      6     11     797      /local/domain/0/backend/vbd/3/51728
But it’s in the state “closed” (read this for details on the different states)! I don’t know why, yet, but if you want to use that device anyway, continue reading :-)
Solution
Depending on your compute node’s OS and your hypervisor the required actions can differ, I’ll try to cover the most important commands.
In the example above server1 runs on a SLES12 host with Xen-Hypervisor. That means that you can’t use the deprecated “xm” commands anymore (especially the block-attach command was easier here), only “xl” or “virsh” are the options here.
So first we have to remove that device from server1:
root@compute:~ # xl -f block-detach 3 51728
root@compute:~ # xl block-list 3
Vdev  BE  handle state evt-ch ring-ref BE-path
51712 0   3      4     9      8        /local/domain/0/backend/vbd/3/51712
By the way, the ISCSI target is still connected:
root@compute:~ # virsh domblklist 3
Target     Source
------------------------------------------------
xvda       /var/lib/nova/instances/fb6227fb-bcb7-4105-9aac-30c222333e3e/disk
xvdb       /dev/disk/by-path/ip-192.168.124.81:3260-iscsi-iqn.2010-10.org.openstack:volume-21daa760-6b9e-41ea-bae8-adf2130b15d5-lun-1
Anyway, to re-attach the block device enter:
root@compute:~ # xl -f block-attach 3 format=raw, vdev=xvdb, access=ro, devtype=cdrom, target=/dev/sdb
root@compute:~ # xl block-list 3
Vdev  BE  handle state evt-ch ring-ref BE-path
51712 0   3      4     9      8        /local/domain/0/backend/vbd/3/51712
51728 0   3      4     11     877      /local/domain/0/backend/vbd/3/51728
As you can see, the state is now “connected” and ready to use, check your instance:
server1:~ # cat /proc/partitions
major minor  #blocks  name

 202        0    5242880 xvda
 202        1     730112 xvda1
 202        2    4511744 xvda2
 202       16    3145728 xvdb
If you run your compute node on SLES11, you can still use the “xm” commands (server2 is my instance):
root@compute:~ # xm block-list 9
Vdev  BE handle state evt-ch ring-ref BE-path
51712  0    0     4      12     8     /local/domain/0/backend/vbd/9/51712
51728  0    0     6      -1     -1    /local/domain/0/backend/vbd/9/51728

root@compute:~ # xm block-detach 9 51728 -f
root@compute:~ # xm block-list 9
Vdev  BE handle state evt-ch ring-ref BE-path
51712  0    0     4      12     8     /local/domain/0/backend/vbd/9/51712

root@compute:~ # xm block-attach 9 phy:/dev/sdb /dev/xvdb r
root@compute:~ # xm block-list 9
Vdev  BE handle state evt-ch ring-ref BE-path
51712  0    0     4      12     8     /local/domain/0/backend/vbd/9/51712
51728  0    0     4      14     1014  /local/domain/0/backend/vbd/9/51728

server2:~ # cat /proc/partitions
major minor  #blocks  name

 202        0   41943040 xvda
 202        1    1131520 xvda1
 202        2   10482688 xvda2
 202        3    5244928 xvda3
 202        4    1048576 xvda4
 202       16    3145728 xvdb
 202       17       4096 xvdb1
 202       18    2862918 xvdb2
If these commands don’t help you to resolve your issues you could try “virsh” tools. There are some commands that do pretty much the same as “xm” or “xl”, but as I’m not very familiar with “virsh” I didn’t use it except for some list commands.
There are two more things to say.
You have to be aware that the devices are detached after reboot. You would have to repeat above steps to reattach them.
If you decide to detach a volume while your instance is running you could be facing major issues, you should always shutdown your instance before detaching a volume. Otherwise cinder will report “error_deleting” state and you won’t be able to detach it. Getting your environment back into a solid state could then take a while.